10. Candy Canes, traditional or flavored? Or Chocolate Covered Cherries?
Used to LOVE chocolate-covered cherries, but now they taste like chemicals (because they are, maybe?!), and I've never been a candy cane fan either. Hmmm.... home-made candies win over all three options (see Wednesday's post!).
I LOVE wrapping presents! So, you can just imagine how thrilled I am that this post from last year has had more hits than anything else I have posted in the last 12 months - by ALOT!
So, for those of you who missed it, and for those who are starting your holiday wrap-fest, here ya go...
Bow Tutorial
I like to wrap everything first, then pull out all the ribbons, and floral picks, and little ornaments, and the glue gun and then GET BUSY!
For the little kids, I don't spend a lot of time making their presents fancy because let's be honest, they don't really care - it's all about the toys. But even for theirs, I cannot bring myself to stick a store-bought bow in the middle and call it done. I still want them to look pretty under the tree. By adding one more bow or two, it makes them just a little more special.
For the little kids, I don't spend a lot of time making their presents fancy because let's be honest, they don't really care - it's all about the toys. But even for theirs, I cannot bring myself to stick a store-bought bow in the middle and call it done. I still want them to look pretty under the tree. By adding one more bow or two, it makes them just a little more special.

My Mama taught me how to make my own bows when I was little, and you can make them so much bigger and prettier (and color coordinated) than the bows-in-a-bag. See....
Bow making is one of those critical life skills, so here's my attempt at a tutorial. (I tried to crop out the huge pile of fancy bits and trash scattered on the floor around me.)
Florist ribbon is the best and easiest to work with. It's needs to be a little stiffer than regular satin, but not so stiff that it splits when you pull it.
The first step is to make a loop with the ribbon. If there is a shiny side to your ribbon, make sure that it faces outward. My loop in for this bow was probably about 5 - 6 inches in diameter.
The first step is to make a loop with the ribbon. If there is a shiny side to your ribbon, make sure that it faces outward. My loop in for this bow was probably about 5 - 6 inches in diameter.
Next, tape the loop closed on the inside - don't worry about seeing the tape - you won't when you're done. I use plain old scotch tape on the inside and wrap it around the edges a bit.
Once it's secure, start wrapping ribbon around and around the loop. The more times around you wrap it, the fuller your bow will be. 8 - 10 times is usually more than sufficient.
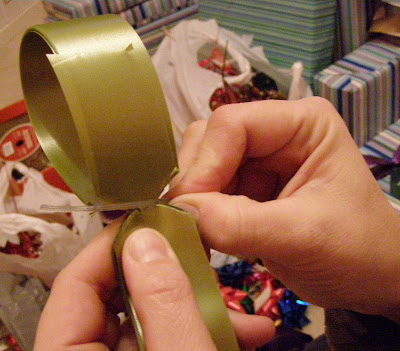
Pinch the loop in the middle and cut out a v-shaped notch on each side. Don't cut all the way through - make sure you leave a little bit of ribbon in the middle so it's still all one piece.
Take a twist-tie and wrap it around the middle of the loop - it fits nicely in those notches you just cut. If you have long twistie things you can leave the ends long and use that to secure it to the package later. I don't usually do that (refer to my hot glue reference above).
(I couldn't crop out the background in this one. I'm normally quite tidy... ahem.)
Your first attempt(s) may be a bit flat, but don't worry, you will get the hang of it.
When you're done, it will look like this. At this point, you'll probably want to "fluff" it a bit and position the loops to so it is full all over.
Here's one that's been fluffed and glued onto a present.


