Saturday, December 10, 2011

Bow Tutorial - Revisited

25 Days of Christmas

10. Candy Canes, traditional or flavored? Or Chocolate Covered Cherries? 
Used to LOVE chocolate-covered cherries, but now they taste like chemicals (because they are, maybe?!), and I've never been a candy cane fan either.  Hmmm....  home-made candies win over all three options (see Wednesday's post!).


I LOVE wrapping presents!  So, you can just imagine how thrilled I am that this post from last year has had more hits than anything else I have posted in the last 12 months - by ALOT!

So, for those of you who missed it, and for those who are starting your holiday wrap-fest, here ya go...

Bow Tutorial

I like to wrap everything first, then pull out all the ribbons, and floral picks, and little ornaments, and the glue gun and then GET BUSY!

For the little kids, I don't spend a lot of time making their presents fancy because let's be honest, they don't really care - it's all about the toys. But even for theirs, I cannot bring myself to stick a store-bought bow in the middle and call it done. I still want them to look pretty under the tree. By adding one more bow or two, it makes them just a little more special.

I LOVE the way the one on the top right turned out. It's just three store bought bows and three leaves off a floral pick. If I'm getting out the hot glue gun, then everything goes on with hot glue. I love that stuff! And those sticky backs on the bows are worthless. :-)

My Mama taught me how to make my own bows when I was little, and you can make them so much bigger and prettier (and color coordinated) than the bows-in-a-bag. See....


Bow making is one of those critical life skills, so here's my attempt at a tutorial. (I tried to crop out the huge pile of fancy bits and trash scattered on the floor around me.)

Florist ribbon is the best and easiest to work with. It's needs to be a little stiffer than regular satin, but not so stiff that it splits when you pull it.

The first step is to make a loop with the ribbon. If there is a shiny side to your ribbon, make sure that it faces outward. My loop in for this bow was probably about 5 - 6 inches in diameter.


Next, tape the loop closed on the inside - don't worry about seeing the tape - you won't when you're done. I use plain old scotch tape on the inside and wrap it around the edges a bit.

Once it's secure, start wrapping ribbon around and around the loop. The more times around you wrap it, the fuller your bow will be. 8 - 10 times is usually more than sufficient.


Pinch the loop in the middle and cut out a v-shaped notch on each side. Don't cut all the way through - make sure you leave a little bit of ribbon in the middle so it's still all one piece.


Take a twist-tie and wrap it around the middle of the loop - it fits nicely in those notches you just cut. If you have long twistie things you can leave the ends long and use that to secure it to the package later. I don't usually do that (refer to my hot glue reference above).


(I couldn't crop out the background in this one. I'm normally quite tidy... ahem.)


Once the middle part is secured, you start to pull and twist. Start on one side and beginning with the inside loop, pull out one layer of ribbon. Pull it towards the right, and while you're doing that twist it upwards (pic 3). Pull the next interior loop out towards the left (pic 4), and twist up while your pulling. At this point, it should look like pic 5. Put some muscle in the pulling part - you want to make sure the loops stay where you put 'em. Continue doing this, alternating directions until one side is complete (pic 6). Then turn the loop around and repeat on the other side.

Your first attempt(s) may be a bit flat, but don't worry, you will get the hang of it.

When you're done, it will look like this. At this point, you'll probably want to "fluff" it a bit and position the loops to so it is full all over.

Here's one that's been fluffed and glued onto a present.


And here's a whole bunch awaiting the hot glue treatment!

So pretty!  LOVE!

Have you finished shopping yet?  Are you all wrapped up and decorated?  Where are you in your prep for the holly-daze?

Linked up here, here, here and here.

Friday, December 9, 2011

Nativities & Quiche (huh?)

First things first - 25 Days of Christmas 
9. Do you have a nativity displayed through the holidays?

Absolutely - it's the first thing I put out every year!


(I think I'll be moving the 25 Days to the end of my posts from now on - just finding the transitions a bit awkward when it's at the top.) :-)

Last night I made quiche for dinner and I doubled the recipe so I could freeze a couple for when things start to get crazy over the next few weeks. This is an awesome recipe - but, then again, it has bacon in it so how could it be bad?! 

And without further ado, here ya go....

Quiche Loraine!


And I got it from an old, old church cookbook.  Aren't those the best?!


Good for breakfast or dinner or whenever.

Linking up at Life in Grace and here

Thursday, December 8, 2011

Thanksgiving Catch Up

25 Days of Christmas
8. What's on the top of your tree?
A peacock!  He's very festive.  Isn't he awesome?!  Gilding the lily perhaps...


In the midst of all the Christmas Craziness, I just wanted to do a quick catch up on Thanksgiving.  We had dinner at our house - only 9 of us.  As I mentioned earlier, Chicken Little and I managed to get the Christmas decorations up before everyone arrived, and I was so VERY, VERY THANKFUL for that!


The table was lovely - I kept it simple and kind of rustic.


As you can see, I did wait until the next day to decorate the table for Christmas.


The food was awesome, and way too much - of course!


And the company was fabulous!


LOVE! 

We finished the day off by venturing into the insanity that was Black Friday (on Thursday) at Walmart.  But there is a super secret Wally World by my house (no, I'm not telling you where), and we were able to get in at 9:30, grab our loot at 10:00 on the dot, and get out by 10:30!!!  No shoving, scratching or pepper spray involved - Woo Hooo!!!

Wednesday, December 7, 2011

Date-Nut-Apalooza!

25 Days Of Christmas - #7. What's your favorite holiday tradition?

On Christmas Eve, Santa comes to the house and passes out presents WHILE WE ARE AWAKE!!!  When we were kids, we couldn't wait for Santa to show up, but then it got to be even more fun as a grown up and being able to watch the kids and their reactions when Santa knocks on the door, and then gives them the one present that they really, really, really want more than anything.  It's the BEST - just look at that face!


Another one of our Christmas traditions is making date nut candies.  There are two recipes that you almost cannot have Christmas without:  Date Nut Balls and Date Nut Loaf.  Both of them are old family recipes.  I was looking for them this year and ran across my grandmother's old 'recipe book'.


It's falling apart, but isn't that amazing?! It's chock full o' yumminess, and if you're not hungry, then you can even find a recipe for blue hydrangeas. (When left alone, our soil only grows pink hydrangeas.)


Are you ready for Date-Nut-Apalooza? Is there anything better than dates, pecans (pronounced puh-kahns, not pee-cans), and sugar? I think not! Can you handle it?!  Buckle up, here we go...

Date Nut Balls

OMG!  These are my favorite - of all time!


(Hint:  Oleo is margarine, or you can use butter)


And, the second act...

DATE NUT LOAF

OMG!  This is my favorite... of all time! (notice a pattern?)


Here's the secret handshake (a.k.a. a modernized translation) for success with this recipe:

Boil 3 cups of sugar, 3 tablespoons Karo Syrup, and 1 1/2 cups whole milk until it reaches the soft ball stage.  Stir in 8-ounce package of chopped dates.  Continue to boil and do not stir again until it reaches the firm ball stage.  Remove from heat and fold in 1 cup shredded coconut, 1 cup pecan pieces, and 1 teaspoon vanilla.  Pour onto waxed paper, form roll/loaf, and allow to cool before slicing.

I would LOVE to show you a picture of this one, but I got distracted and burned the sugar.  ARGH!  You have to keep the heat relatively low and really pay attention to the temp because it will burn in a second.  So, this is what it shouldn't look like - bummer!


Anyway - better luck to you!  Now that you have the recipes, you can officially have Christmas this year.

Linkin' up and Eatin' up over at Edie's place:  Life in Grace.  (Still LOVE!)  And linking up here

Tuesday, December 6, 2011

Christmas House Tour - 2011

25 Days Of Christmas
6. When do you put up your decorations?

Most years we start decorating as soon as the Thanksgiving dishes are put away.  A couple of times in the past few years, I've decorated before Thanksgiving, and that is AWESOME!  I always feel a bit guilty about it, but it is really nice to have some extra time to enjoy them.  This year, I wanted to start early, and I 'proclaimed' that whatever wasn't put out before the bird was in the oven wasn't going to be done.  Chicken Little and I slaved over the house and tree for the two days before Thanksgiving, and by the time the bird was out of the oven we were done.  LOVE being finished already!!!

And that makes the perfect intro to the holiday house tour!  :-)  It may not look like it, but I really did try to simplify this year.  We really only festive-ied the living room, dining room and kitchen. Ch-ch-ch-check it out...


Always, the Nativity is the first thing I set up.  This year, it's sitting on top of a cabinet in the living room. The lights look a bit trailer-park in the picture, but trust me, when the lights in the room are dim, it really is pretty. 


Next, I just did a couple of things on the tables - books, ornaments, and then the reindeer in the top photo is sitting on the chest in our entry way to hold the Christmas cards.

I had a vision for the dining room, and it came out PERFECT!  Once I unearthed the reindeer and glued the antlers back on (bummer!), it took about 5 minutes. Simple, easy and pretty!  L.O.V.E. 


And we're walking....walking...walking... into the living room.


We hang the stockings on the hall tree because our mantle is pretty small.


Aren't these wooden shoes wonderful?!  Chicken Little's great aunt (? - not sure if that's the right designation, but you get the idea) painted these for us when CL was just a toddler. 


Just keepin' it simple.  (right....)


I like my traditional hodge-podgey tree with a million-billion ornaments, bubble lights, and lights of every color.  It's my favorite!  (Yes, that's a peacock at the top - stay tuned for more about him in a future post.)

And we're walking.... walking...into the kitchen.


These shelves have been empty all year - I never got around to putting the dishes back in them after last Christmas!  So, all my little holiday folks just hopped right back up there like they never left.


On the table, I kept the same hurricanes and burlap runner we had at Thanksgiving (maybe I'll play catch up later this week and show you some of those pictures).  I also had pumpkins out, so I replaced those with Santa and some trees... et voila! 

C'est fini!  I'm done!  (As usual, Lola cannot be bothered with any of it.)

So that's it!  Today I just wanted to give you the quick tour.  Later in the week, I've got a couple of 'detail' photos to share of the tree, mantle and dining room decorations up-close-and-personal.

Have you finished all of your decorating yet?  Are you getting excited?  I am!  I'm thrilled that I have this entire month off of work, so that I can take some time to really enjoy this holiday.  What a blessing!

Linking up EVERYWHERE:  here, here, here, here, here, here, here, here, here, here, here and here.

Monday, December 5, 2011

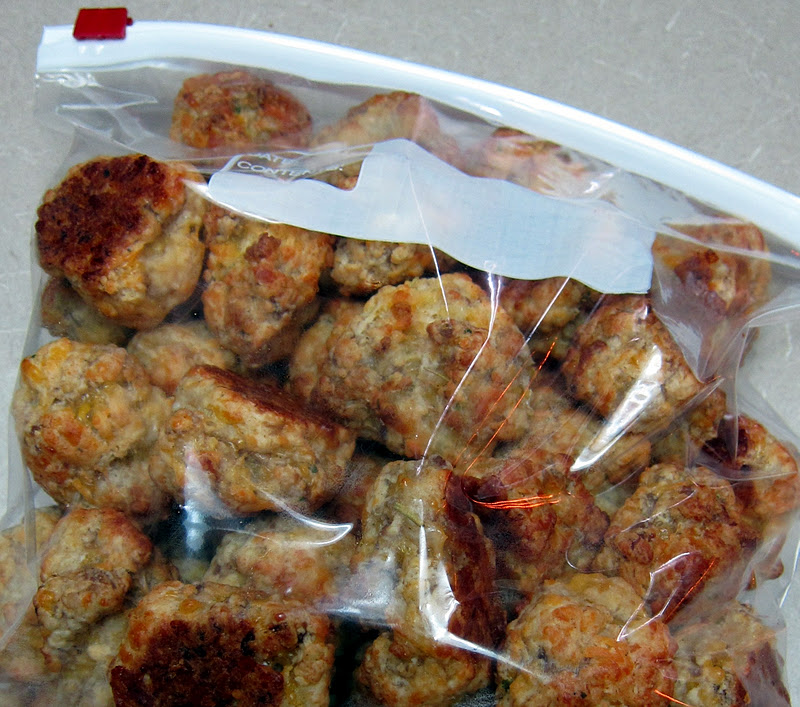
Sausage Cheese Balls

Before we get to the cooking portion of our show, let's take care of the 25 Days of Christmas business. 

5. Do you hang mistletoe?  Nope - I'm not opposed, but it's just not a tradition we ever did when I was a kid, so I've never added it to my list.


OK - now on with the shew, and oh what a shew we have for you today!

I like to bake in advance and then put stuff in the freezer so the last week before Christmas, I can just take it easy.  (HA! yeah, right - but at least that's always my plan.)  Anyway, it's that time.  I'm thinking about what I'm going to be baking, and I decided to start easy with with a quick appetizer that freezes beautifully.

These Bisquick sausage cheese balls are super, duper easy and they are so, so, so yummy!  So, here ya go:

SAUSAGE CHEESE BALLS


3 cups Bisquick (I use the low fat version - makes no sense when you read the rest of the recipe, but it seems like a good idea.)
1 pound ground sausage (I used Jimmy Dean regular flavor)
4 cups shredded cheddar (it will work with any hard cheese you have on hand)
1/2 cup Parmesan cheese
1/2 cup milk
1/2 teaspoon dried rosemary
1/2 teaspoon dried parsley
Preheat the oven to 350, and grease two large sheet trays. 


Mix all ingredients in a large bowl (I think its easiest to use your hands to mix it up). 


Roll mixture into 1 inch balls and place onto sheet trays.  You can put them pretty close to each other because they don't spread or puff up very much at all.


Pop 'em in the preheated oven for 22 - 28 minutes until the tops are lightly browned.


Remove from oven and serve warm.  If you are going to freeze them, allow them to cool completely (you do not want any condensation in the container or they will get soggy), and then transfer to an airtight container. 


They'll keep for several weeks in the freezer, and when you're ready to serve them, allow them to thaw completely and then you can reheat them in the microwave or a preheated oven for a few minutes.


Serve with ranch dressing or BBQ sauce.

YUMM-A-LICIOUS!

Linking up over at Life in Grace. (LOVE, LOVE, LOVE Edie!)  Also linking up here.

Sunday, December 4, 2011

21 Days Until Christmas!

Ahhh.... late as usual.  (*chuckle*)
So I saw this post on Julie's blog, Balzer Designs, and thought it was a great idea for getting me back into the blogging habit.  One quick, easy question to answer each day until the B.I.G. day... 

I don't think these questions will be the only things I post about each day, but it will give me something to say, and it's not a lot of pressure. 

So, I've got four days to catch up on, and then I'm on track. Here goes:

  1.  Colored lights or white lights on your house or not at all?


I LOVE, LOVE, LOVE houses with all blue lights.  I also like all white or all multi-colored strands.  Whatever you do, I think you should commit to one color scheme.  Keep in mind that I am saying this as the proud winner of the Worst-Lights-in-the-Neighborhood Award for several years running. 

Right now, it's dark - we got nuthin'.

  2.  Hot chocolate or Egg Nog?   HOT CHOCOLATE!!!!!!!!  Not a fan o' the nog.

  3.  What's your favorite holiday dish? 


COOKIES - duh!  I'm still debating whether or not I will be baking this year.  I'm sure I will give in and whip some up.  Soooo many things on the list - somethings gotta give, but if I don't make 'em, nobody will!  Unless I can guilt Chicken Little into make a few batches when she gets home.

  4.  Does Santa wrap the presents or just sit them under the tree?


A picture is worth a thousand words.  Please excuse the dark, grainy photo, it was shot by secret camera planted in Santa's workshop. 


Please feel free to play along!  If you do, leave a comment so we can all see how you're celebrating this year.